Introduction
In this article, we will discuss Managing and Creating Segments.
To create a Segment, go to the New Record > Segment subtab

To Manage Segments, go to Member List > Manage Segments subtab.

Segments Grid
When on the Segment page, you can see all created segments, and if permissions are given, you can create a new segment by pressing the New Record button. A segment is a massive data filter, taking all the robust data inside the loyalty platform and filtering it down to business-specific needs.

Create Segment - Segment Details subtab
When creating a segment, the first step is to name it. Next, select the privacy settings. Depending on your user preference, you can make the segment Public and available to all locations within the reward program. You can also make it Location Private and choose which locations have access. You can also make the segment Business Private, which makes it visible to users at or above your user role. After choosing the privacy settings, you can select whether the segment is active or not.

- Segment Name - Enter a name for this segment, such as Leads in Florida or Members who subscribed in March. This name is used for your reference only and is never visible to members.
- The Public setting makes the segment visible to all location system users in the program.
- Location Private makes the segment visible to all locations selected.
- Enabling Business Private will hide the segment from users with lower permissions. The setting is used with businesses that privatize content from locations.
Next, choose the member lists that will participate in the segment. You can choose specific lists using the dropdown, or Select All Home & Visited Members, All Home Members, or All Visited Members.

- Which members do you want to segment? You can select All Visited Members who’ve visited a location or multiple member lists by ticking the ones you want to include.
Next, choose the match type under the Segment Rules section and match all rules and conditions or any rules and conditions. Suppose any of the rules and conditions are created. In this case, if multiple filter options are used, only one filter must reach the rule criteria for the member to be displayed in the segment.

- Match Type - How do you want the segment rules you create below to be applied? Choose ‘Match all rules to only see members who match every rule you create. Choose Match any rule to see members who match one or more rules.
There are multiple types of segment filters. Different rule options will display when selecting a filter type, allowing you to filter the setting most optimal for your needs. The first section includes Basic Fields such as:
- Email Address
- Gender
- Email Format
- Email Confirmation Status
- SMS Confirmation Statuses
- Activity Status
- Zip Code
- Birthday
- Anniversaries
- Unanswered Negative Surveys
- Last Transaction
- Available Offer

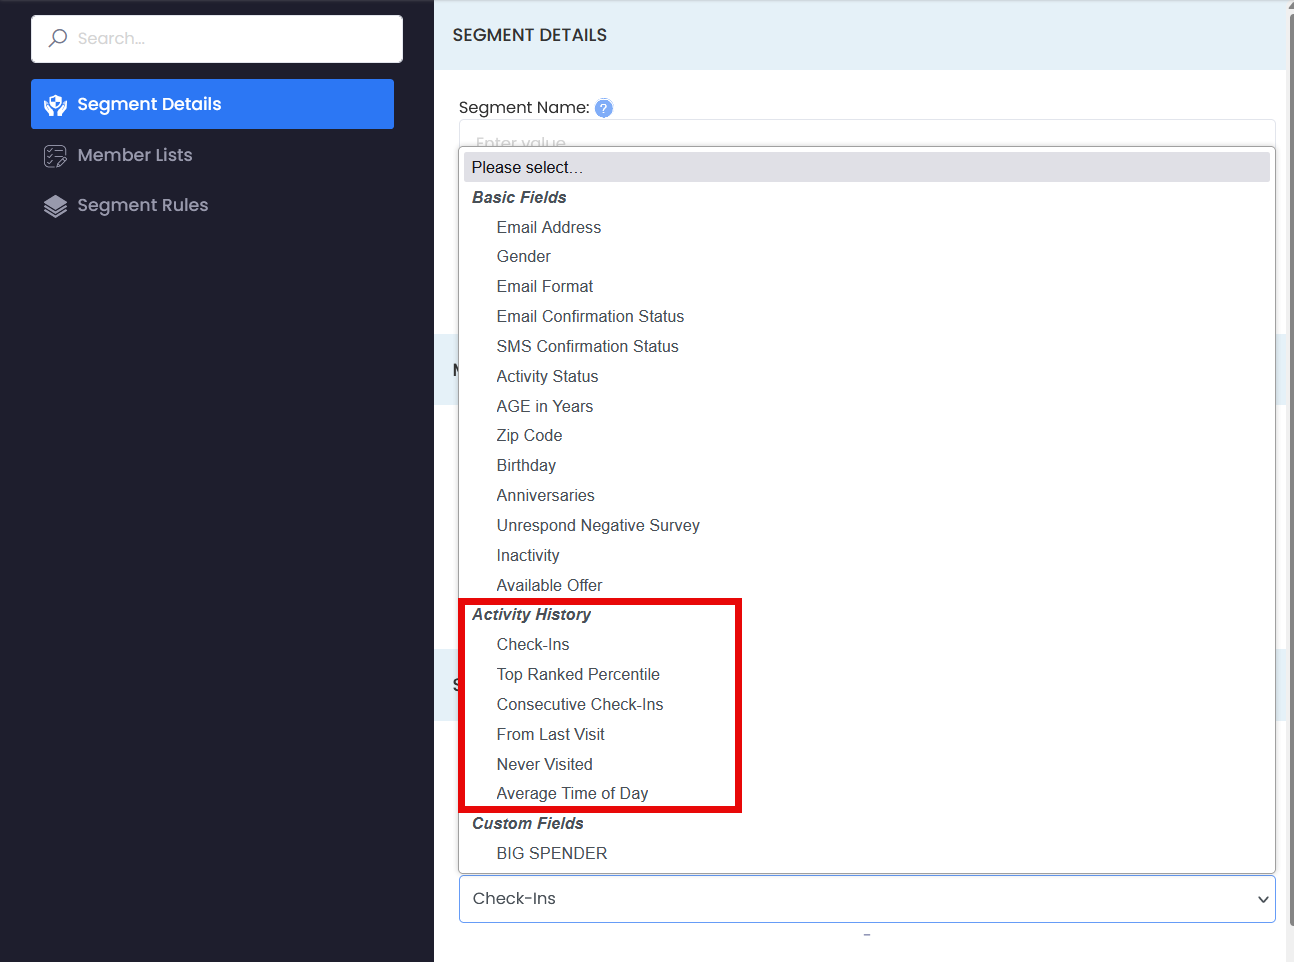
The next section of segment filters is based on Activity History. The type of program you are using determines the kinds of visible filters. A Check-In Visit program will include the following filters:
- Check-ins - Segment members who checked in during a given timeframe.
- Top Ranked Percentile - Segment members by check-in rank. After creating the segment, market to top check-in members. For instance, market the top 15% members a special offer 1, top 16-25% of members special offer 2, and everyone else offer 3.
- Consecutive Check-Ins - Segment members by how many times they consecutively check-in during a single visit.
- From Last Visit - Segment members based on inactivity.
- Never Visited - Segment members that have never check-in.
- Average Time of Day - Segment members based on the time of day they visit.
- Imported Data Rule - If data was imported to track the Total Check-Ins or Total Spending, select All Time to include this data.
A Spending program will include the following filters:
- From Last Visit - Segment members based on inactivity.
- Never Visited - Segment members that have never visited or spent money.
- Average Dollar Value - Segment members based on how much they spend.
- Average Time of Day - Segment members based on the time of day they purchase.

We can also view the segment members by pressing the view button, and they will be filtered on the member's list page. We can activate the segment by simply clicking the activation button.

If you have any questions, please create a ticket, and one of our support reps will contact you shortly. Thank you.