Introduction
In this article, we will discuss how to manage Member Wallet Forms. You can find member wallet forms by going to the Tools and Settings > Forms tab > Manage Wallet Form sub-tab.

Member Wallet Froms Grid
All forms created in the program will be displayed on the manage Member Wallet Forms page. The green icon is the default account profile form. This form is used when broadcasting if no selected form is chosen when creating the broadcast. On the left side, you’ll notice checkboxes, giving you full control to choose one or multiple forms to delete.

Under the action column on the right, you can edit, copy, delete, or view the form's embed code and short links.

Links and HTML Code
When you visit the links and html page, the first thing that catches your eye is the iFrame HTML Code. This code serves a specific purpose-it can be pasted into a website, and the form will display within the site without the URL. To make things even simpler, you can use the copy button at the top right corner for quick and easy copying of codes. If you want to embed an iFrame, just send this code to your developer. The Join Now Page, Home Page, and Login Page menu short links are next. These links, when added to an existing website as a button, open the link in a new page. You can use a sign-up form with Non-Formatted Code to match your website. The advantage of this is that when someone joins through the Non-Formatted Code, they are instantly added to your program database while keeping the same CSS formatting of your website.

To access the member wallet form, click on the magnifier. You will find an Enrollment Page, a Login Page, and a Contact Page displaying all locations.

Enrollment Page

Login Page

Contact Page

Locations Page

To edit the form, click the edit button or the "Form Name" hotlink.

BASIC SETUP TAB
On this page, you can select the list that new members will be added to upon joining the program. One common reason for creating various forms is to add members to specific contact lists. Instead of creating multiple forms, another option is to include a question on the sign-up form asking members for their favorite location, and then create segments based on these locations. This is a better way to organize members by location, rather than creating multiple forms. 
NOTE:
- Default Member List - When a member joins the program, they are added to this list. If using point tiers, members are added to a higher point tier if a higher point tier is selected. Members are not moved down in tiers if tier points are lower than tier requirements.
The sender profile is the default email used for communications. If there are multiple locations, each using a unique sender profile, the “Location Default” is typically used. When using the Sender Profile Location Default, a broadcast will use the sender profile associated with the location the member has chosen as their favorite location inside their account profile. If using multiple forms, choose a default form that members will open when they receive broadcasts that include a form link. In this section, you can also change the form completion actions. Customize the form completion page by using a pop-up or redirecting to a given website.

NOTE:
- Sender Profile - Which person or company should be shown in the From Name field for emails of this Web Forms Program?
- Default Form - If chosen, this is the default form found in the broadcasting dynamic content areas of each communication sent. If more than one form is created, you have the option to attach a different form to each communication instead of using the default.
- Email New Contacts Details to You - You will receive an email with the contents of the form once submitted. The user will be subscribed to your list and sent to the thank you page. If they are already subscribed to your list, they will be shown the thank you page instead of an error message.
REQUIRED SETTINGS SUBTAB
After the form is submitted, you have two options. You can either direct the member to their created profile, or loop back to the original form. Usually, looping back to the original form is used if a business allows members to sign up inside their physical business location.

- After a form is created and the confirmation message is shown, you can choose where to redirect the member.
- Loop back to the original form: Take the member subscriber back to the original empty form for someone else to join.
- Redirect to user created profile: Takes the member to their personal member profile.
ERROR MESSAGE OPTIONS SUBTAB
The error message appears if there's an issue during sign-up. You can opt for a pop-up message or redirect to an existing website.

- Error Message Page - This is what your members will see if there was an error during the sign- up process. For example, they are already subscribed to your member list.
FORM FIELD SETTINGS SUBTAB
The form field settings are the fields required to join the program. You have the option to change the display name and select which fields are required. To add custom fields, go to the Member List -> Edit Member List and under the Custom Fields section, click the custom fields that you would like to display.

NOTE:
- FORM FIELD SETTINGS
- Yes, Required on Signup - Displays on mobile and web signup forms & required to join the program.
- Yes, Required After Signup - Displays on tablet signups & required to join the program. Also, found inside the member profile after signup & required to complete profile.
- Yes, Not Required - Displays on the member profile after signup & not required to complete the profile.
- No, Do Not Ask - Does not display on signup forms or in the member profile.
BRANDING SUBTAB
The Branding settings allow you to upload a logo or use text on the member profile.

- Logo Image - The optimum image size is displayed, but any size will work and format accordingly.
- Favicon Image - Optionally upload an icon file (ending in .ico) here which will be shown in the browser address bar.
THEME SETTINGS TAB
The Theme settings are selected here. You can choose a pre-created template or add your own custom color settings. The selection on the left will determine the items on the right, but each sub-item on the right can also be customized. If allowed, you can save these selections as a "template" to use in the future.

- Image Templates - Select a pre-created template as a starting point. All Images can be overwritten.
- Color Templates - Select a pre-created template as a starting point. All Theme Color & Style Settings can be overwritten.
MENU TAB
You can select which menu items you want to display in the public and private menu. Each area can have a custom menu name for the main menu and sub-menus. You also have the option to create a custom menu with custom links. You are free to choose which links are displayed on the pages before login and on the private pages after login.

PUBLIC/PRIVATE HOME PAGE TAB
The area at the bottom right of the member wallet form is called the Public/Private Home Page Settings. You have the option to display any text and icons you want and can toggle up to four options.


PUBLIC PAGES – BEFORE LOGIN TAB
HOME PAGE SUBTAB
This page is visible to non-members before they log into the program. Here, you can customize your settings. You have the option to display one or multiple banners. If you select a banner, you can also choose to display a logo on the right. Additionally, you can choose to place the banner under the menu, which looks good if you are using transparent header bar menu colors.


NOTE:
- Banner Under Menu - Placing the banner under the menu looks nice if using transparent menu settings. The banner can have any length.
- Logo Image - The optimum image size is displayed, but any size will work and format accordingly.
The banner overlay settings allow you to change the opacity, as found here.

PUBLIC PAGES – BEFORE LOGIN TAB
LOGIN PAGE & JOIN NOW PAGE SUBTABS
You also have the option to customize your Login Page. The Join Now page has similar settings.

PRIVATE PAGE – AFTER LOGIN TAB
HOME PAGE SUBTAB
After logging into the program, you can customize everything on the page. You can display different banners and logos, similar to the home page before logging in. You have the option to show a "Below Banner Ribbon" and a "Point Summary Bar." You can also adjust the dynamic text settings on the bottom left of the home page. Since we work with multiple program types, some use points, visits, and cashback, etc., all settings and text can be customized.


PRIVATE PAGE – AFTER LOGIN TAB
CHILD PAGES SUBTAB
The child pages include all pages within the member wallet, excluding the Home Page. You can choose to position the banner under the menu, similar to the home page. You can also select which dynamic content fields will be displayed on these pages.


When the “Full Page Width” toggle is ON, the child page is displayed in full width according to the specified Width Size, which can be set from 0% to 15%
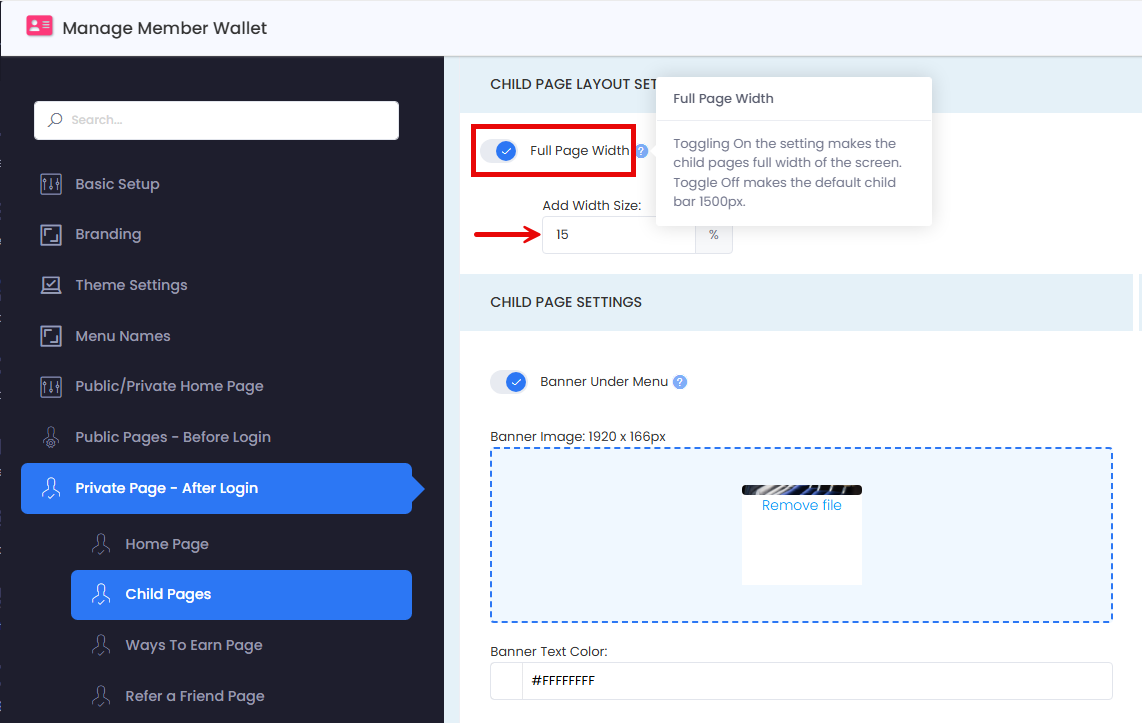
NOTE:
Full Page Width - Toggling On the setting makes the child pages full width of the screen Toggle Off makes the default child bar 1500px
PRIVATE PAGE – AFTER LOGIN TAB
WAYS TO EARN PAGE SUBTAB
On the Ways to Earn page, you can choose which settings to display and which images to use. If none are selected, the default images will be displayed.


PRIVATE PAGE – AFTER LOGIN TAB
REFER A FRIEND PAGE SUBTAB
You can customize the refer friend page.

Customize the introduction text displayed on the member wallet and the suggested email text sent to the friend being referred.


Furthermore, you can modify the call-to-action text to increase the number of sign-ups!

FOOTER SETTINGS
There are four sub-footer settings as well as a setting for the bottom-of-the-page footer. The sub-footer section allows you to display different links on the web and mobile browsers. The fourth sub-footer is a Feedback Form. You can choose to display the sub-footers on public and/or private pages, and on web and mobile platforms. Typically, these are not used on mobile pages.


You can additionally include a footer. Typically, businesses add their email, phone number, and copyright settings, as seen here.


If you have any questions, please create a ticket, and one of our support reps will contact you shortly. Thank you.